
You have probably watched the professional golfers on the TV working hard with their caddies on each shot and looking into what seems like a complete folder of books and papers stored in their back pocket.
All these papers are the documents and guides they use to help plot their way around the golf course. They will use a yardage and a greens book.
In this post we will be focusing on the yardage book, showing you how to make your very own yardage book and course guide for your own golf club.
If you are looking for a printable golf yardage book template that you can use as a golf yardage book template to create your own golf course yardage book, this article will certainly help.
Table of contents
- Yardage book background and information
- What you will need
- Find your course
- Screenshot images of each hole
- Create a map of each hole and features
- Add in the yardage book distances
- Export your hole maps for printing
- Printing and binding your yardage book
- Check distances and refine on the golf course during a round
- How to use your golf yardage book
Yardage book background and information
Before we get into how to make a yardage book, lets take a closer look at what the pro’s have with them during a round and how they use them.
My journey in creating my own yardage book started by trying to find examples of the yardage books used on the PGA and European tours.
I found a number of examples, but one in particular caught my attention. This was Dustin Johnson’s yardage book used at the Pebble Beach Pro AM in 2014. Golf Digest had photos of each page in the yardage book which I found fascinating.
It provided a clear guide as to what to include in the yardage book which really helped me.
I also found some excellent examples on the Strokesaver website, a company that produces professional yardage books for some of the most prestigious golf courses. This example from Royal Lytham & St. Annes is a good example of one used in the Open Championship.
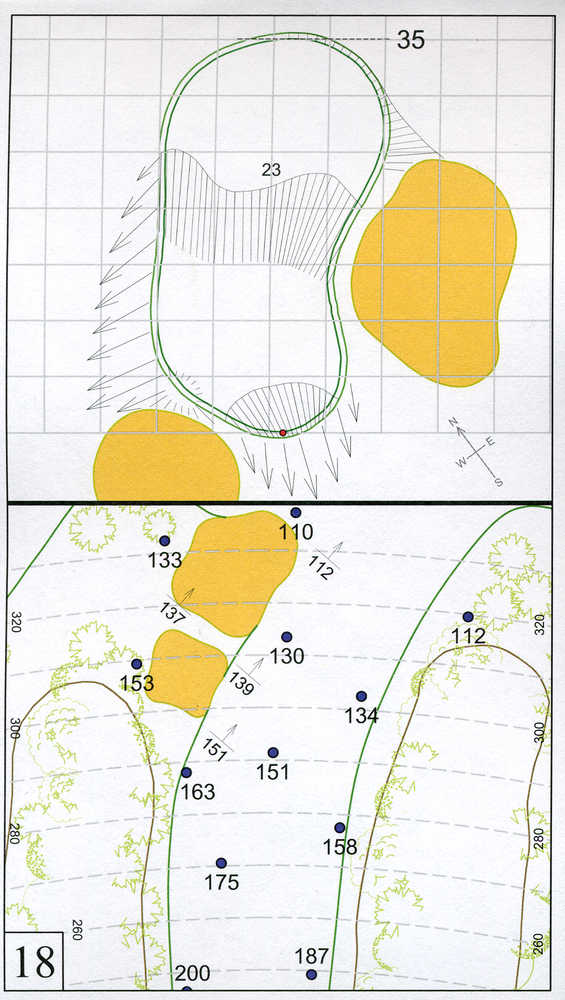
Image from August.com
Finally, who wouldn’t want to take inspiration from the Augusta yardage book used at The Masters? He is an image from Ian Poulter on Instagram.
Having taken on board all this information from the professional yardage books I started to go about creating my own.
What you will need
In order to create your very own yardage book you will need the following:
- Google Earth Pro software – available for the Mac and PC
- Graphics package – I use Affinity Designer but you could equally use any other vector drawing package such as Adobe Illustrator
- Printer
- Paper slicer
- Long arm stapler
Google Earth Pro
The concept of creating your own yardage book will be to use arial photographs of the holes on your chosen golf course to map out the hole including its features.
I have found that the best tool for doing this is Google Earth Pro.
This is free to download and provides all of the features you need to create your own yardage book.
Find your course
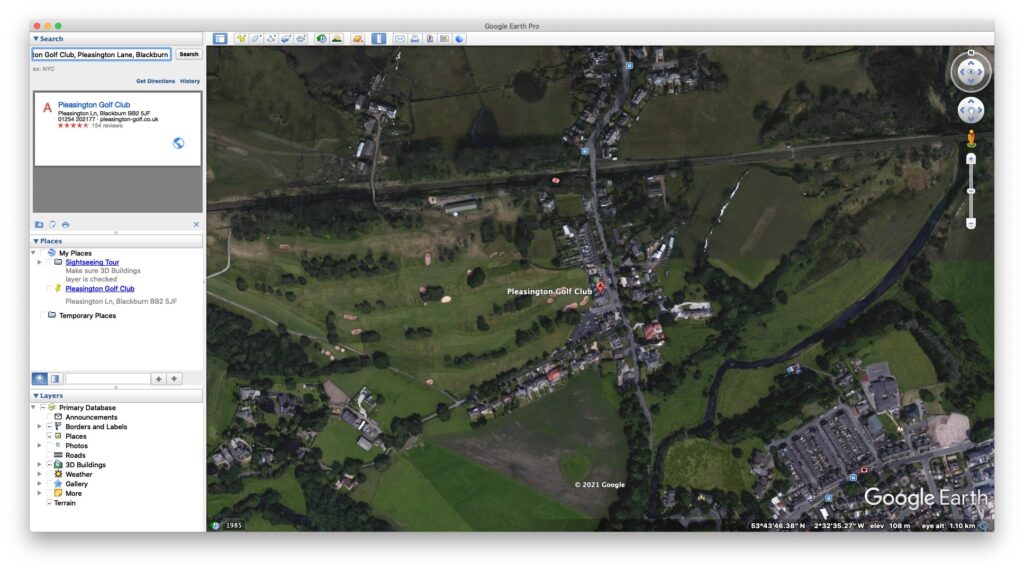
Once you have Google Earth Pro installed on your machine, the next step is to find the golf course you are looking to create your yardage book for.
In the top left of the Google Earth Pro screen you should see a search box. Enter the name of town on your course and it should display in the dropdown list of suggestions. Click on the item in the dropdown list and the map in the main panel should zoom into your course.
Screenshot images of each hole
Once you have found your course, the next step is to create screenshots of each of the holes on the course.
The screenshot is going to be used to effectively trace the features off and therefore you need to make sure that you have in the image you take all of the features you want to add to the yardage book.
These should include:
- Tee boxes – there are probably more than 1 on most holes
- Fairways
- Greens
- Green fringes
- Bunkers
- Trees and bushes
- Water hazards
- Buildings
- Marker posts – often on blind holes to help the golfer know in which direction to play shots
- Brooks, ditches and streams
- Cart paths
- Out of bounds fencing
- Bridges
As you can see from the professional examples above, they contain a great deal of detail, all of which you want to include in your own yardage book.
Creating screenshots on both a Mac and a PC is very straight forward. On Mac you can press Cmd + Shift + 4. You then click and drag over the area of the screen you want to create your screenshot from.
On a PC you can use the Snipping Tools in Windows to do something similar.
Create a map of each hole and features
Once you have your screenshot of each hole, the next stage is to map out the features in each hole.
Add your hole screenshot to your graphics package and then lock it in place.
Once locked, use your graphics packages vector pen tool to trace round the different features of the hole. I recommend starting with the tee boxes, then the fairway outlines and the onto the green.
Once those features are in place you can spend time adding other relevant features onto the hole. Remember to add in all the features that you want to add distances to and from.
I always add in significant features such as trees, bunkers and ditches which I may want to get a yardage from.
Add in the yardage book distances
Perhaps the most important part of the yardage book of course is the distances. Distances are important for golfers as they help massively with club selection.
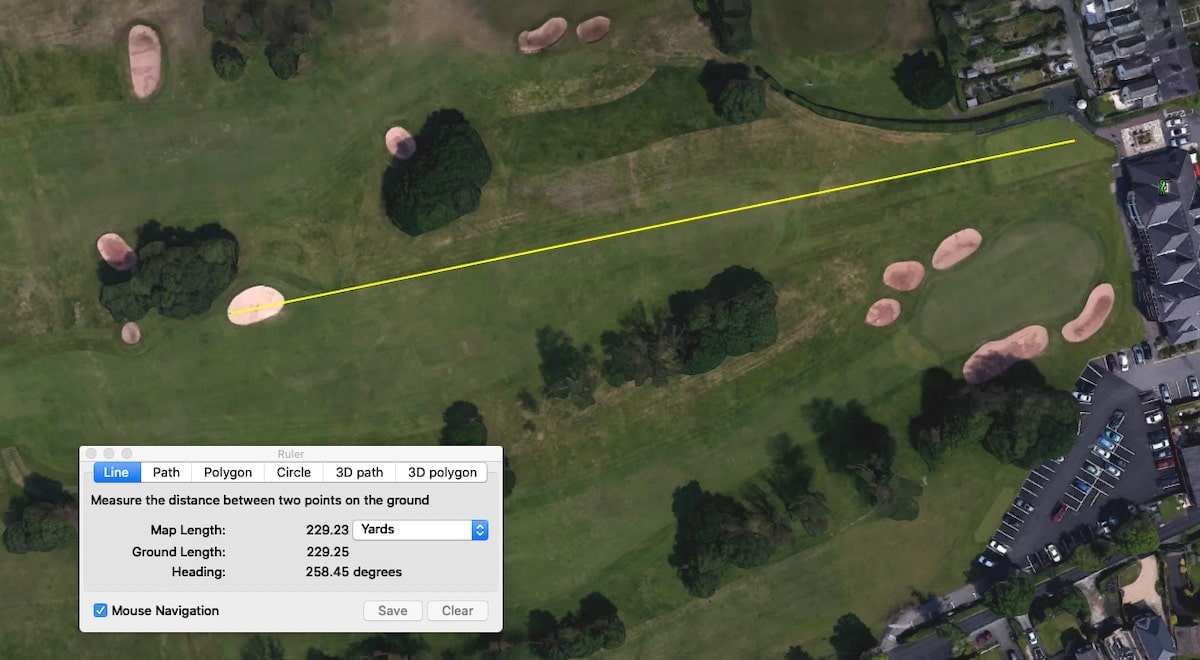
Thankfully Google Earth Pro amazingly has a distances measuring tool built in! You can set the distances to either metres or yards, depending on how you measure your distances on the course.
To measure distances in Google Earth Pro, from the main toolbar icons across the top of the screen, select the ruler icon.

What distances to measure?
This really is a personnel preference. I would recommend adding in distances off of the tee – if course adding in the points where you are likely to hit the ball as well as distances to the front the green from the fairway where you are likely to be hitting your second shots from.
The example images above give you some ideas on how you could present the holes. I gained inspiration from viewing a number of different yardage books and combining the aspects that I liked.
Export your hole maps for printing
Once you have each hole created in your vector graphics package, you will need to export these as images which can then be combined onto printing sheets to produce your yardage book.
Exporting depends on your graphics package, however you want to end up with 2 images for each hole.
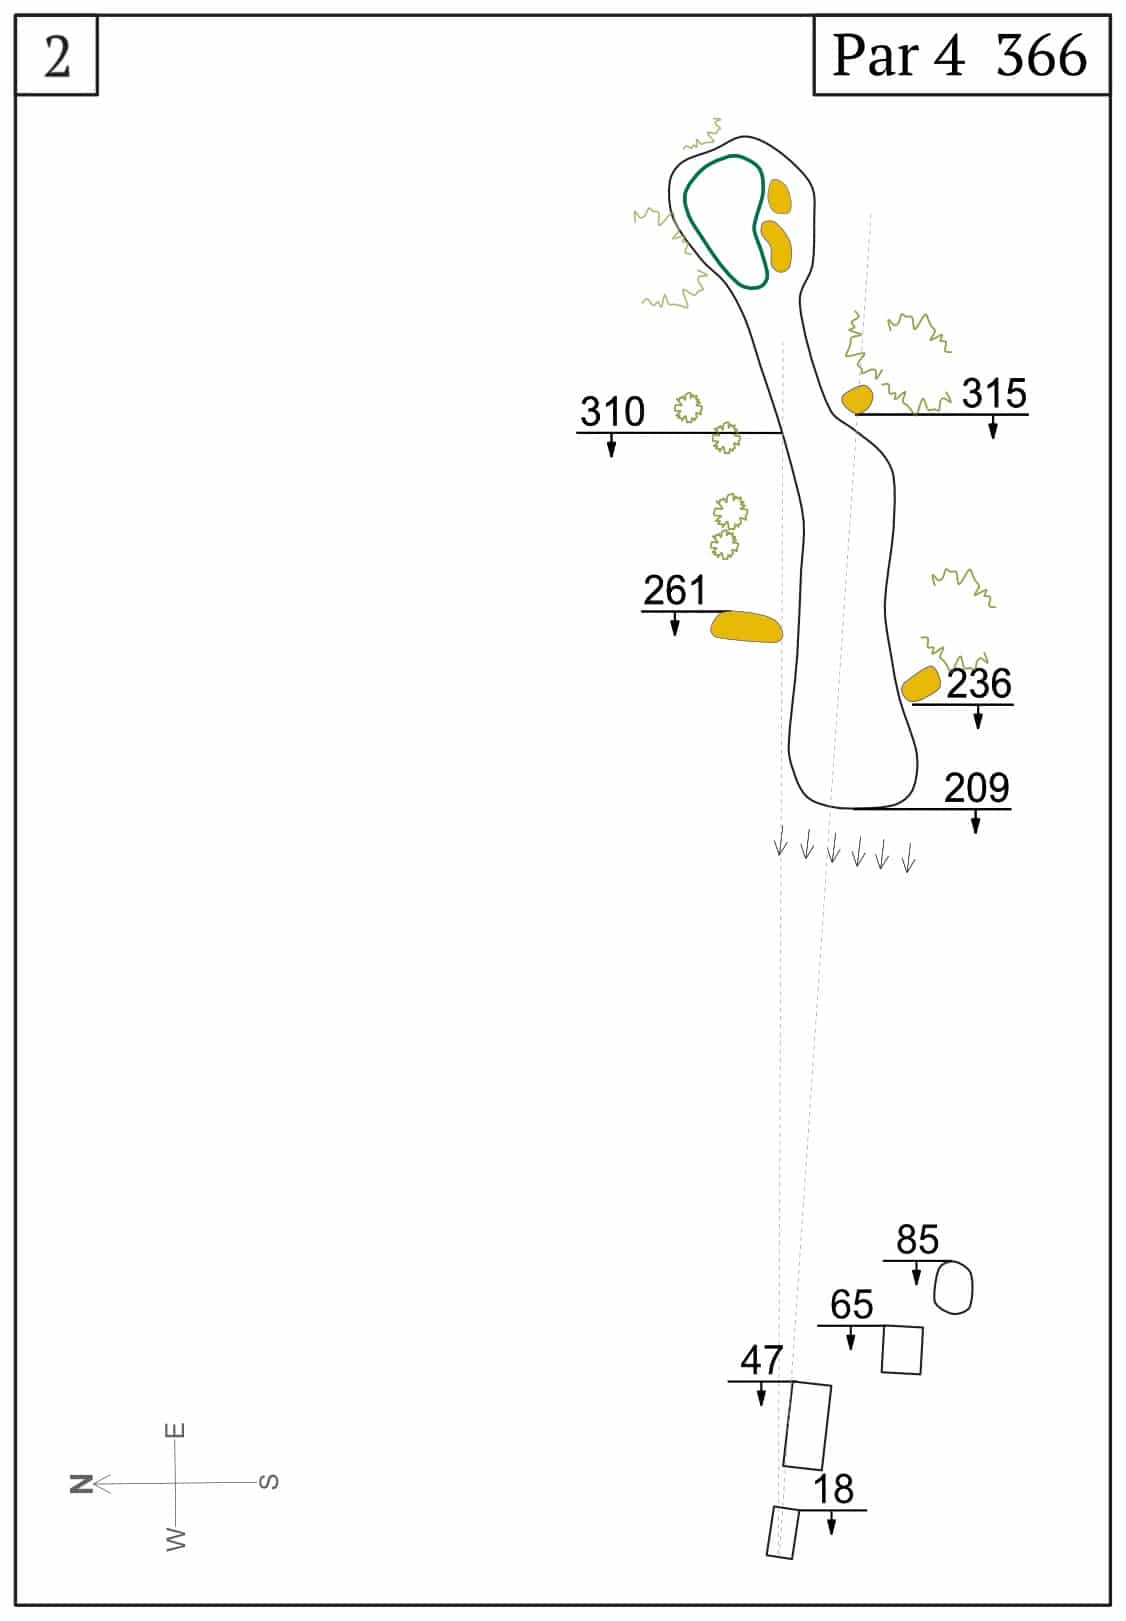
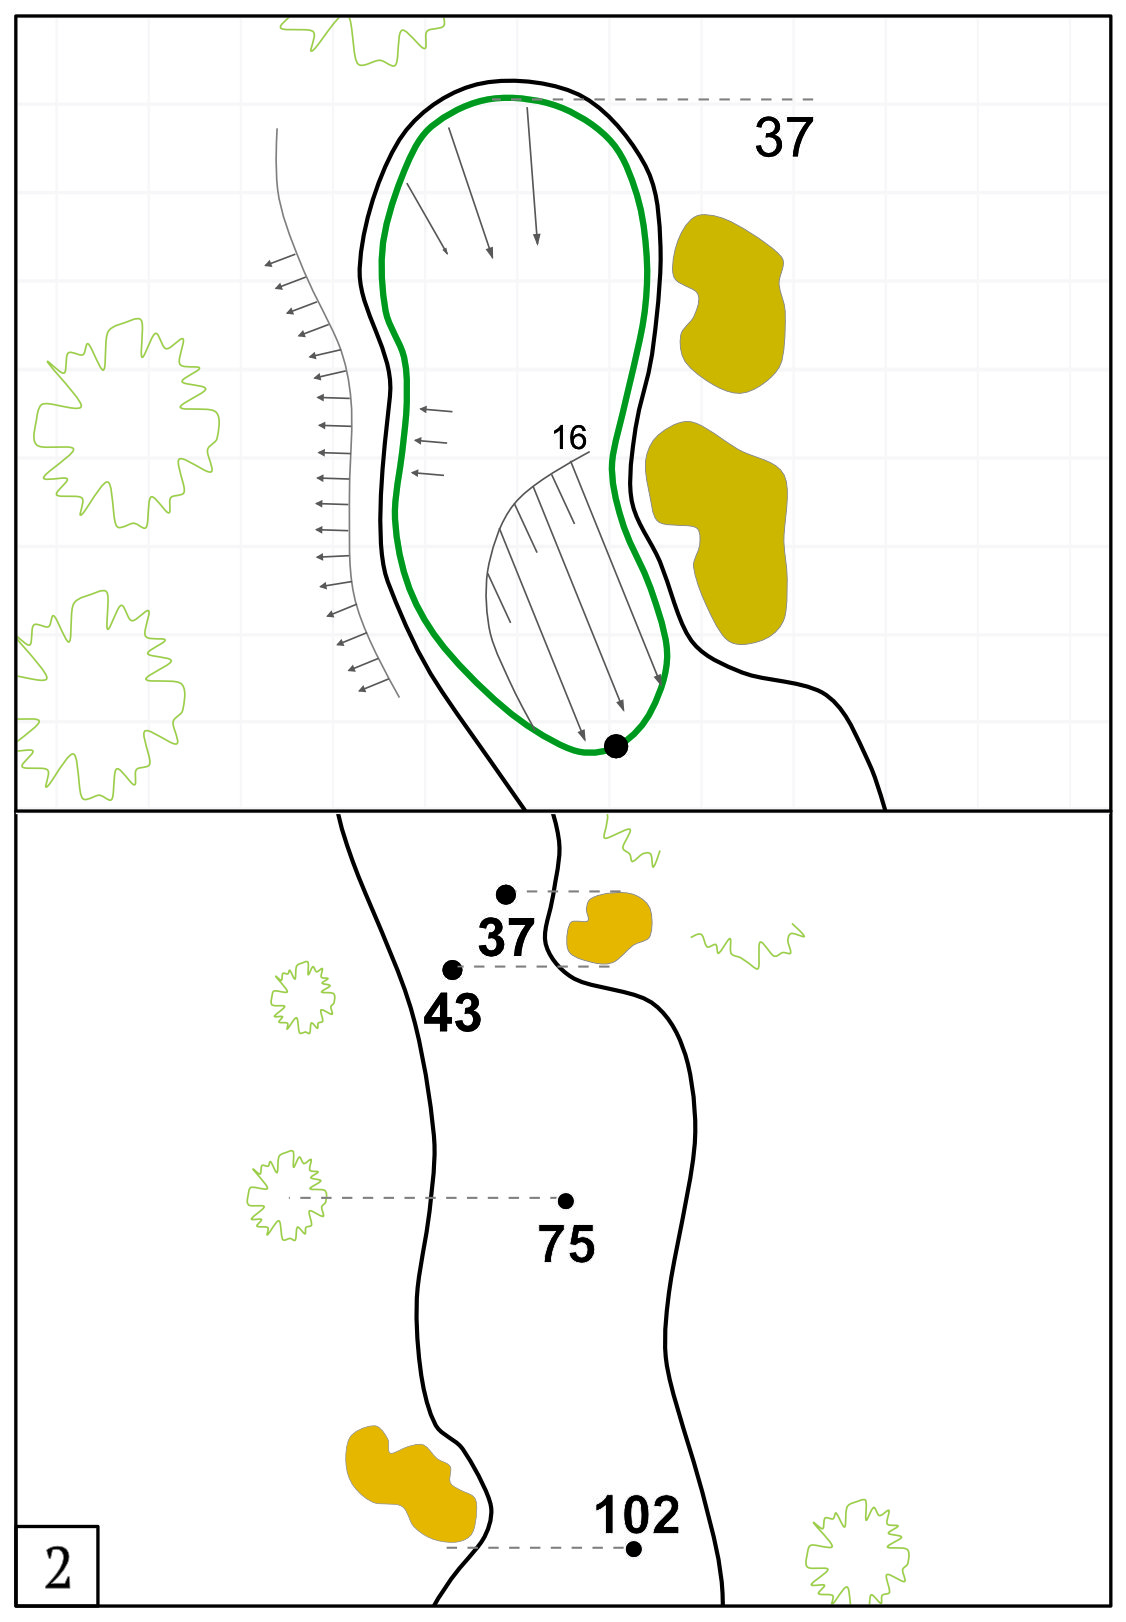
The first image is the hole overview (see the left image above). This is a birds eye view of the entire hole from tee to green. This should contain the yardages off the tee to the points on the fairway or to the front and back of the green for par 3s.
The second image for each hole should be a closer image of the shape of the green, including any major slopes which you can mark on your image and the landing zone in the fairway. This image contains the yardages to the front of the green from some of the major features.
I would recommend exporting the images in a JPG format in at least 300 DPI resolution. You need then large enough so that they don’t blur when added to the printing template. I would recommend a minimum width of 1200px.
Printing and binding your yardage book
You should now have 36 images. 18 images of the fairway and green of the holes and 18 image of the hole layout.
The next stage is to add these to a printing template which you can then print and prepare for making into your yardage book.
I would recommend an A4 template, and the key is to make sure you print the images in the correct places on the template so they can be cut and sliced to produce the yardage book.
Once you have added your images to the print template, you need to print the yardage book on both sides of your paper. Many printers allows for this but if yours doesn’t you will have to feed the paper back into the printer.
It is very important that you print on both sides using the short axis of the page.
Once printed, cut along the lines you can see in the image above using a paper slicer or a guillotine.
You can then fold each long page in half at the centre line before placing them all together in the correct order.
You then need a long arm stapler in order to staple your yardage book in the centre.
Check distances and refine on the golf course during a round
Finally, once you have printed your yardage book and you are ready to use it, go out on the course and check you have everything mapped correctly.
If possible you can use a laser range finder to test your distances are correct. Additionally if you range finder can measure adjusted distances based on slope, you can add the difference in yardage (plus or minus) to your yardage book.
How to use your golf yardage book
Now you have produced the perfect yardage book, you can use it to really help you out on the course when you are playing a round of golf.
Firstly, look at the yardages to where you want your tee shot to finish. You can also look at were some key hazards are to help you with club selection.
On approach shots pace out the number of paces (yards) from where you ball is to the nearest yardage in your book in order to get a number to the front of the green.
I would also make notes in your yardage book about which clubs you hit on particular holes, how far they went and what the conditions were like.